For the latest round of the [3x6] Sampler Quilt Mini-bee, I really felt like making some sort of nine patch variation. I was noticing a lot of pinwheel and star type blocks, and I wanted to deviate from that, while keeping the look neat and traditional.
I've always admired the tidy look of the Burgoyne Surrounded block, but I'd never tried one, for a couple of reasons. For one thing, it seems to use a ton of white, which isn't ideal for stash-busting, and I like sending off colorful bee blocks. For another, I've never seen instructions for a Burgoyne Surrounded block that was less than 15 inches square - not ideal for a bee, or even just your average sampler quilt made up of 12-inch blocks.
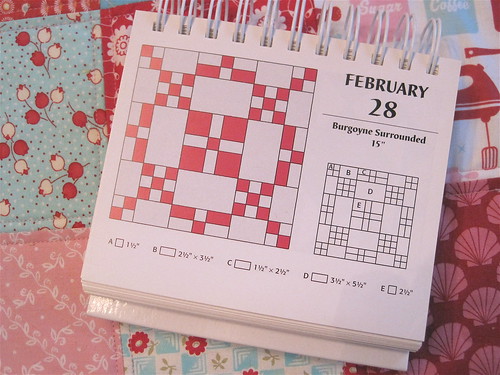
Still, it caught my eye again when I was flipping through my invaluable block-a-day calendar, and I got the idea to reduce it down to a nine patch-centric design, replacing the largest white pieces with a vibrant print.
Here's the block I made for Mona:
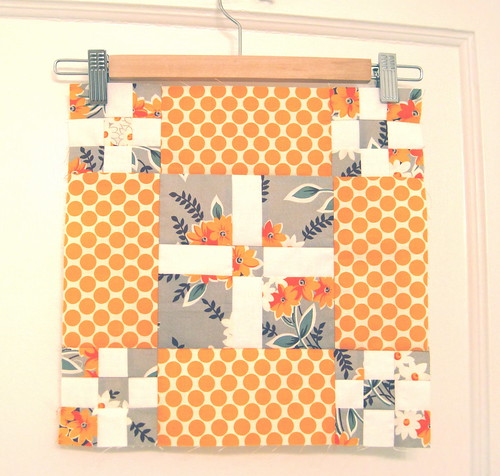
I think the orange dotty sections add a lot of life, letting the center unit and the white bits really pop. Since "Burgoyne Surrounded" is named for what happened at the Battle of Saratoga, I think I'll call this variation "Saratoga Chic."
To make a Saratoga Chic block in three fabrics, start by cutting a 1.5-inch strip from a 45-inch wide cut of white fabric. Trim selvedges, then cut:
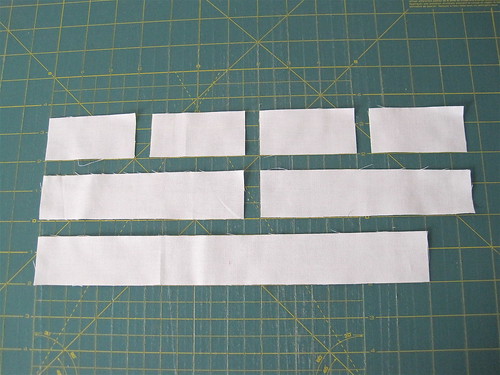
1 strip, 12 inches long
2 strips, 6 inches long
4 strips, 3 inches long
From your central focus fabric (I'm obviously using red) cut another 1.5-inch strip the entire width of the fabric, then cut that down to:
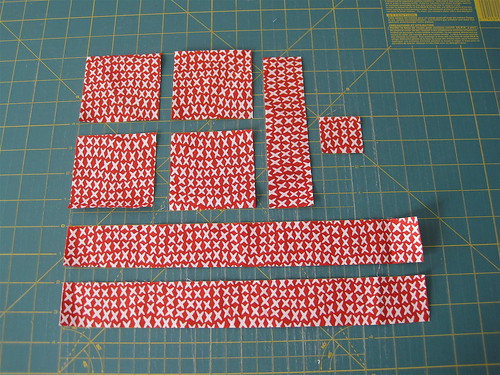
2 strips, 12 inches long
1 strip, 6 inches long
1 square, 1.5 inches
You'll also need to cut 4 3-inch squares from the same fabric.
Finally, for the aforementioned side bits, cut four rectangles from a fun print.

These should measure 3.5 inches x 6.5 inches.
To construct the center unit of the block, join 2 of the 3-inch squares with a 1.5" x 3" rectangle. Repeat. Join the remaining 1.5" x 3" rectangles to either side of the tiny 1.5" square.
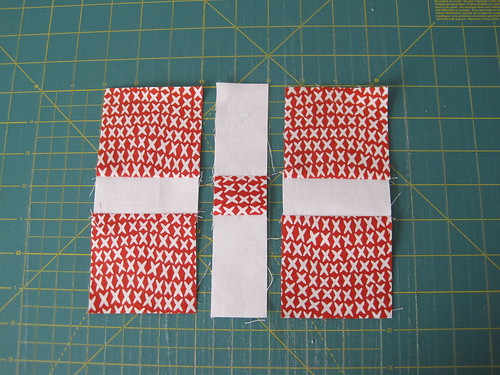
Look! It's the beginning of a nine patch variation! Press seams and sew these strips together to make your center unit.
For the bitty nine patches, take your longer strips and sew them in sets of three, with colors alternating, like so:
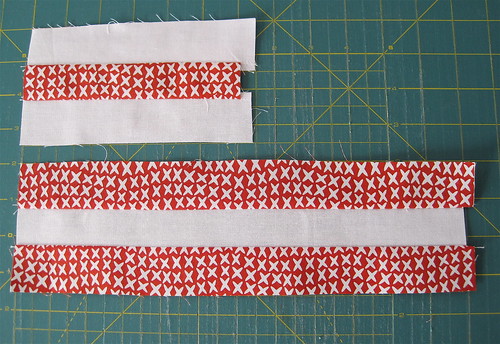
(You can see that I cut some of my strips a little long, because I like a bit of wiggle room.)
Now, slice each strip set into 1.5-inch long segments.
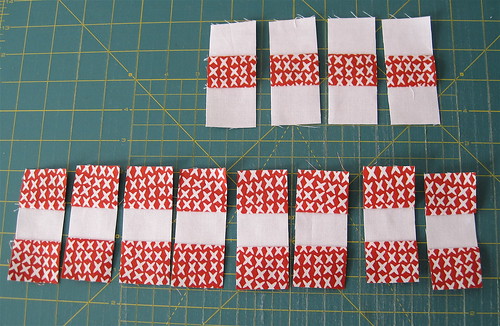
The short (6") set will yield 4 nine patch "middles." The long (12") set will yield 8 "sides."
You know what to do next:
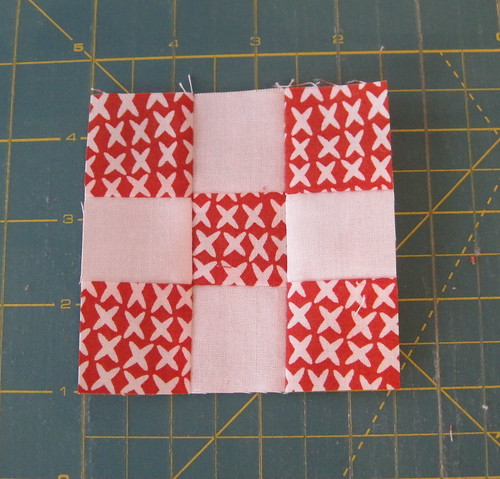
Few things are as life affirming as a teeny, tiny, nine patch. Make one for each corner, then grab all your pieces, sewn and not, for the final layout.

See where we're going with this? The most crucial thing at this point is to trim, trim, trim. I use scant 1/4" seams when piecing, so my nine patches tend to be a little large. They won't fit perfectly with the striped rectangles unless the corner patches are 3.5", and the center unit is a perfect 6.5" square.
Now, join everything together, and admire!
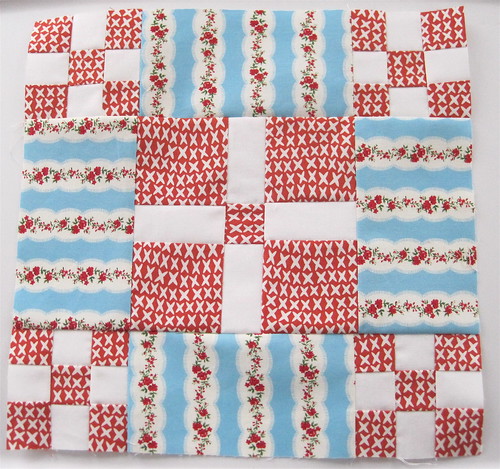
A couple of notes:
I've always admired the tidy look of the Burgoyne Surrounded block, but I'd never tried one, for a couple of reasons. For one thing, it seems to use a ton of white, which isn't ideal for stash-busting, and I like sending off colorful bee blocks. For another, I've never seen instructions for a Burgoyne Surrounded block that was less than 15 inches square - not ideal for a bee, or even just your average sampler quilt made up of 12-inch blocks.

Still, it caught my eye again when I was flipping through my invaluable block-a-day calendar, and I got the idea to reduce it down to a nine patch-centric design, replacing the largest white pieces with a vibrant print.
Here's the block I made for Mona:

I think the orange dotty sections add a lot of life, letting the center unit and the white bits really pop. Since "Burgoyne Surrounded" is named for what happened at the Battle of Saratoga, I think I'll call this variation "Saratoga Chic."
To make a Saratoga Chic block in three fabrics, start by cutting a 1.5-inch strip from a 45-inch wide cut of white fabric. Trim selvedges, then cut:

1 strip, 12 inches long
2 strips, 6 inches long
4 strips, 3 inches long
From your central focus fabric (I'm obviously using red) cut another 1.5-inch strip the entire width of the fabric, then cut that down to:

2 strips, 12 inches long
1 strip, 6 inches long
1 square, 1.5 inches
You'll also need to cut 4 3-inch squares from the same fabric.
Finally, for the aforementioned side bits, cut four rectangles from a fun print.

These should measure 3.5 inches x 6.5 inches.
To construct the center unit of the block, join 2 of the 3-inch squares with a 1.5" x 3" rectangle. Repeat. Join the remaining 1.5" x 3" rectangles to either side of the tiny 1.5" square.

Look! It's the beginning of a nine patch variation! Press seams and sew these strips together to make your center unit.
For the bitty nine patches, take your longer strips and sew them in sets of three, with colors alternating, like so:

(You can see that I cut some of my strips a little long, because I like a bit of wiggle room.)
Now, slice each strip set into 1.5-inch long segments.

The short (6") set will yield 4 nine patch "middles." The long (12") set will yield 8 "sides."
You know what to do next:

Few things are as life affirming as a teeny, tiny, nine patch. Make one for each corner, then grab all your pieces, sewn and not, for the final layout.

See where we're going with this? The most crucial thing at this point is to trim, trim, trim. I use scant 1/4" seams when piecing, so my nine patches tend to be a little large. They won't fit perfectly with the striped rectangles unless the corner patches are 3.5", and the center unit is a perfect 6.5" square.
Now, join everything together, and admire!

A couple of notes:
- I started with 45-inch wide fabric each time, because that's what was most efficient for me, but this can certainly be made from shorter cuts. The 12" strip set, for example, could be two identical 6" strip sets. Nine patches can also be pieced from individual 1.5" squares, if you're so inclined.
- I know I keep talking up using a cute print for the background, but I'm also quite fond of the block I made for Sudi-Laura, using a pale grey solid. Notice the nine patches and the center unit are made from different red prints - you can really get as scrappy as you want with this.
- One of my favorite things about making this block was that it felt like a really efficient use of fabric. With no triangles or wonkiness, I wasn't tossing out any excess, and that felt like a real plus for me. I can see making a scrap quilt from this pattern, with the white pieces (shown in the first cutting photo) as the unifying element. Since one 1.5" wide strip of fabric = one 12" block, a yard of fabric would yield 24 blocks, which is a large throw, or a good start on a twin quilt.
