April 3, 2011

Sufficient Postage

Quilt: Kaffe Postage Stamps
Progress: 20/??? blocks

Ever try an "ends and beginnings project"? A stack of easy piecing near your machine so that all sewing can chain piecing?

Well, I started something like this two springs ago with a couple of Kaffe Fasset charm packs - I wanted little bursts of bright color, and Kaffe is always a good candidate for that.

Today I ran out of pieces to chain. So as of today, I have 20 "postage stamp" blocks that look like this:


Now what?

March 28, 2011

Figgy Pudding

Last Sunday, eight days ago, I made a savory bread pudding according to the method described on Shallots Web.

bread pudding

I haven't made a second, which, if you can't tell from the photo, has required remarkable restraint on my part.

Spoiler alert: this savory dish contains no figs. I've named this post after a dear friend and the author of Shallots Web, Mr. John Newton, whose last name invites a certain fruity nickname that has been expanded over the years to include such names as Fignatious, Mr. Figglesworth, and my own twee contribution, Figgy Pudding. We met in grad school, so my love for him hinges not at all on the fact that he's an excellent cook and bartender.

Seriously, I know the coolest people. If you'll forgive a cliche, try this pudding - the proof, it is there. (And if you won't forgive a cliche, it's your loss if you discount the pudding.)

At the time of baking, I didn't have a ton of leftover veggies or anything, but attempted the dish anyway, with some not-so-healthy additions, because it looked and sounded so frakkin' delicious. For the bread, I used half a day-old French baguette, which I tossed in a mixture of
  • 2 eggs
  • maybe 2-3 tablespoons of milk
  • half an onion, diced and caramelized the day before
  • maybe 1/4 cup shredded cheddar cheese
  • 2 slices of bacon, microwaved and diced
    Then I shredded a small chunk of gouda over the whole thing and baked it for 35 minutes. In a gratin dish, because I like to be fancy. Prep time amounted to, I don't know. Like, a second. This is really easy.

    The results were a lot drier than your typical dessert bread pudding, largely because I feared too moist a mixture would take too long to bake - we were anxious to get to Southie and scout out a good spot for the St. Patrick's Day Parade. And, of course, being savory, there was no sugary, buttery sauce poured over it all. Still, I really loved eating this. The bread cubes were softened on the inside but golden brown and chewy outside, and the cheese and bacon clinging to each bite certainly didn't hurt anything.

    I'm already fantasizing about changing this up a bit for different occasions. It would be a wonderful way to use up leftovers of my famous ham. And speaking of ham, I think bits of prosciutto, chopped apple, and dried cranberries would be a delicious stuffing alternative alongside poultry. As far as cheese replacements, I have some crumbled bleu I'm going to have to use up soon, and I think I've just decided its fate.

    If you try this, let me (and Fig!) know. And tell your friends - we can all work together to make Savory Bread Pudding the new cool brunch/side dish.

    March 25, 2011

    Tutorial: Saratoga Chic

    For the latest round of the 
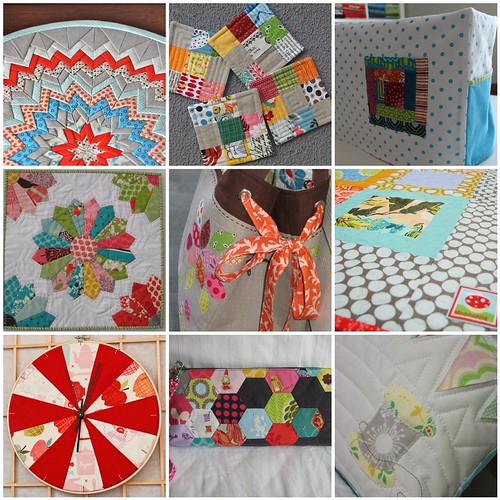
[3x6] Sampler Quilt Mini-bee, I really felt like making some sort of nine patch variation. I was noticing a lot of pinwheel and star type blocks, and I wanted to deviate from that, while keeping the look neat and traditional.

    I've always admired the tidy look of the Burgoyne Surrounded block, but I'd never tried one, for a couple of reasons. For one thing, it seems to use a ton of white, which isn't ideal for stash-busting, and I like sending off colorful bee blocks. For another, I've never seen instructions for a Burgoyne Surrounded block that was less than 15 inches square - not ideal for a bee, or even just your average sampler quilt made up of 12-inch blocks.


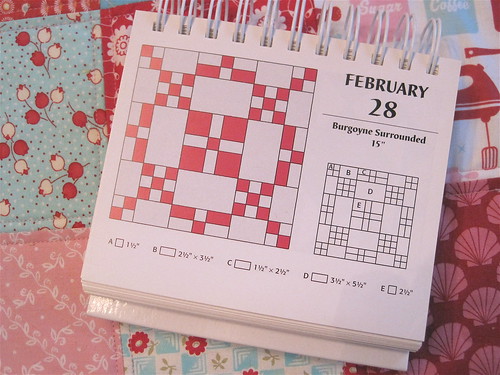
    Still, it caught my eye again when I was flipping through my invaluable block-a-day calendar, and I got the idea to reduce it down to a nine patch-centric design, replacing the largest white pieces with a vibrant print.

    Here's the block I made for Mona:


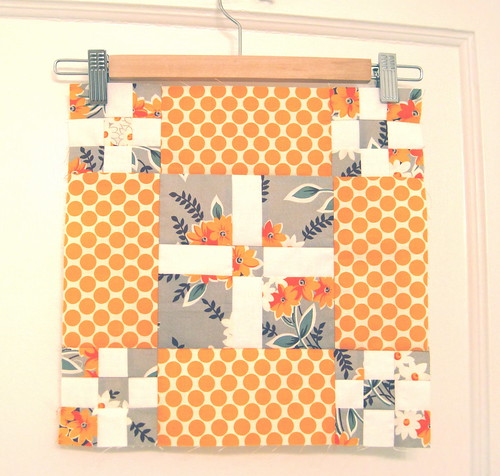
    I think the orange dotty sections add a lot of life, letting the center unit and the white bits really pop. Since "Burgoyne Surrounded" is named for what happened at the Battle of Saratoga, I think I'll call this variation "Saratoga Chic."

    To make a Saratoga Chic block in three fabrics, start by cutting a 1.5-inch strip from a 45-inch wide cut of white fabric. Trim selvedges, then cut:


    1 strip, 12 inches long
    2 strips, 6 inches long
    4 strips, 3 inches long

    From your central focus fabric (I'm obviously using red) cut another 1.5-inch strip the entire width of the fabric, then cut that down to:
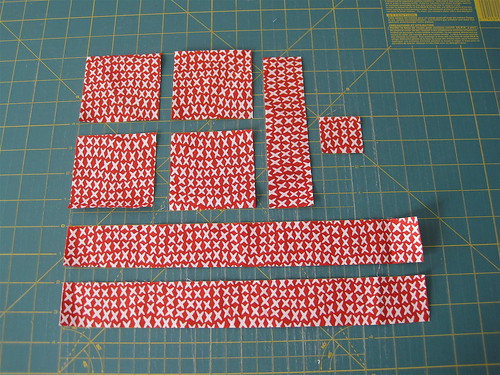


    2 strips, 12 inches long
    1 strip, 6 inches long
    1 square, 1.5 inches

    You'll also need to cut 4 3-inch squares from the same fabric.

    Finally, for the aforementioned side bits, cut four rectangles from a fun print.


    These should measure 3.5 inches x 6.5 inches.

    To construct the center unit of the block, join 2 of the 3-inch squares with a 1.5" x 3" rectangle. Repeat. Join the remaining 1.5" x 3" rectangles to either side of the tiny 1.5" square.


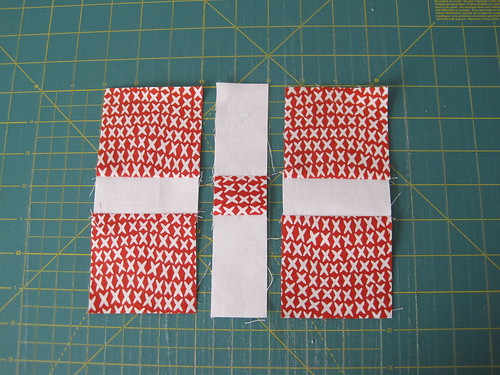
    Look! It's the beginning of a nine patch variation! Press seams and sew these strips together to make your center unit.

    For the bitty nine patches, take your longer strips and sew them in sets of three, with colors alternating, like so:


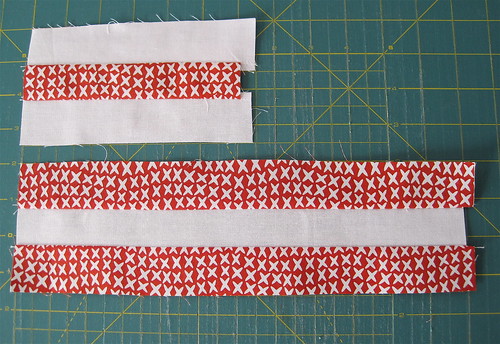
    (You can see that I cut some of my strips a little long, because I like a bit of wiggle room.)

    Now, slice each strip set into 1.5-inch long segments.


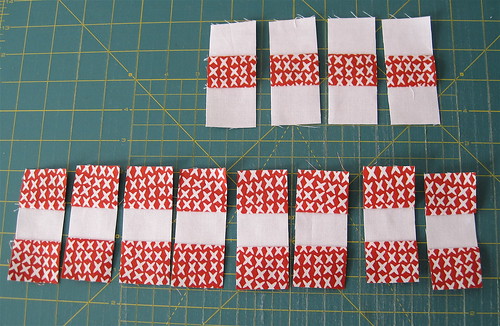
    The short (6") set will yield 4 nine patch "middles." The long (12") set will yield 8 "sides."

    You know what to do next:


    Few things are as life affirming as a teeny, tiny, nine patch. Make one for each corner, then grab all your pieces, sewn and not, for the final layout.


    See where we're going with this? The most crucial thing at this point is to trim, trim, trim. I use scant 1/4" seams when piecing, so my nine patches tend to be a little large. They won't fit perfectly with the striped rectangles unless the corner patches are 3.5", and the center unit is a perfect 6.5" square.

    Now, join everything together, and admire!


    A couple of notes:
    • I started with 45-inch wide fabric each time, because that's what was most efficient for me, but this can certainly be made from shorter cuts. The 12" strip set, for example, could be two identical 6" strip sets. Nine patches can also be pieced from individual 1.5" squares, if you're so inclined.
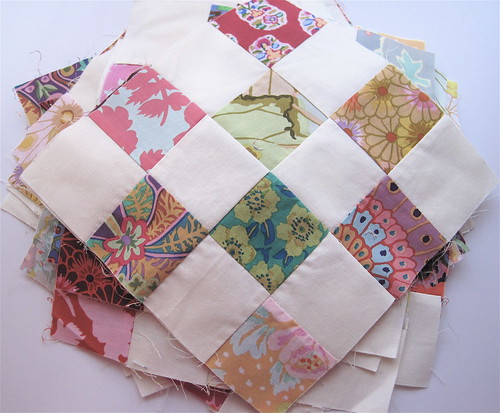
    • I know I keep talking up using a cute print for the background, but I'm also quite fond of the block I made for Sudi-Laura, using a pale grey solid. Notice the nine patches and the center unit are made from different red prints - you can really get as scrappy as you want with this.
    • One of my favorite things about making this block was that it felt like a really efficient use of fabric. With no triangles or wonkiness, I wasn't tossing out any excess, and that felt like a real plus for me. I can see making a scrap quilt from this pattern, with the white pieces (shown in the first cutting photo) as the unifying element. Since one 1.5" wide strip of fabric = one 12" block, a yard of fabric would yield 24 blocks, which is a large throw, or a good start on a twin quilt.


    March 24, 2011

    {urban} home goods swap

    How awesome is the Urban Home Goods swap?

    I don't just love it because I ended up loving my swag this round - though Kristy of Love Old Houses certainly did an incredible job of it. She sent me this adorable drawstring bag I've hung in the bedroom:

    {urban} home goods drawstring bag

    And to match, a wonderfully practical fabric basket:

    {urban} home goods basket

    Don't be jealous, though - you can make your own basket with her nifty tutorial.
    I think these would make incredible gifts!

    No, what is really invaluable about UHGs is the INSPIRATION. Yes, it's nerdy to type it all in caps like that, but in all my years as a flickr member, I don't think I've ever been part of a group that delivered a constant stream of mind-blowing crafty goodness. Here are just a few of my favorite projects from this round:

    Some UHG swap faves
    1. uhg swap finished, 2. UHG Package from *amisha*, 3. UHG, Sewing Machine cover, front, 4. Hoot Dresden by Poppyprint, 5. Urban Grocery Tote, 6. { Urban } HOME Goods , 7. UHG - clock, 8. Zipped hexie clutch, 9. Close up of Spool on Pillow

    March 22, 2011

    Quilts for Japan

    When you're a quilty businesswoman, there's an upside to having unsold merchandise: there's always someone, somewhere, who needs a quilt.


    Quilters Newsletter Magazine, one of my favorite sources of inspiration for years, has received a request from Patchwork Tsushin for quilts for the people of Japan impacted by the recent tsunami.


    Send quilts of any size from baby to adult to:

    Dana Jones
    Quilters Newsletter
    741 Corporate Circle, Suite A
    Golden, CO 80401

    •    Mark your box: “Quilts for Japan.”
    •    Send quilts as soon as possible and no later than April 30, 2011.
    •    Enclose your name, address, phone number, and email address with the quilts.

    If you have questions, please email Dana Jones.